
How to Create a Drupal Landing Page?
Virtual business card, flyer, minisite – all these terms perfectly reflect the nature and essence of landing pages. They consist of several horizontal segments in which advertising content is presented, encouraging you to continue exploring a given topic on other dedicated and full-sized webpages. Let's check the possibilities Drupal gives us when creating these specific websites.
A page made of blocks
To create a one-page website composed of horizontal segments – clearly separated from each other, yet forming a consistent whole – we can use several tools or modules available in Drupal's core. The first option that comes to mind is using blocks. In Drupal, blocks work just like Lego bricks, elements containing any content. They can be displayed in different regions of the page, one above the other. Sounds like something we need!
While the idea of using simple blocks, mainly containing text, will work great in this case, achieving visual requirements or the desire to include slightly more complicated content (e.g. counters, multimedia, combination of text and multimedia, carousel, etc.) seems to be time- and labour-consuming. A high level of block personalization will require us to create several block types and/or content types and additional fields from scratch, along with additional classes for a purpose of a correct display.
For the proponents of clean code - Twig
One of the available solutions is also the option to create a twig collection, where – using the HTML and PHP code – we are able to create a landing page with any level of complexity, using the available or new fields. This option, however, requires us to spend many hours in front of the screen, countless lines of code, not to mention the subsequent maintenance and content management. To implement this solution, one definitely needs a person with technical knowledge – also at the stage of introducing the content.
Creating a Drupal landing page - modules
As we mentioned earlier, a landing page in Drupal can also be built using modules. Let's check out which of them we can use and how.
Layout Builder module
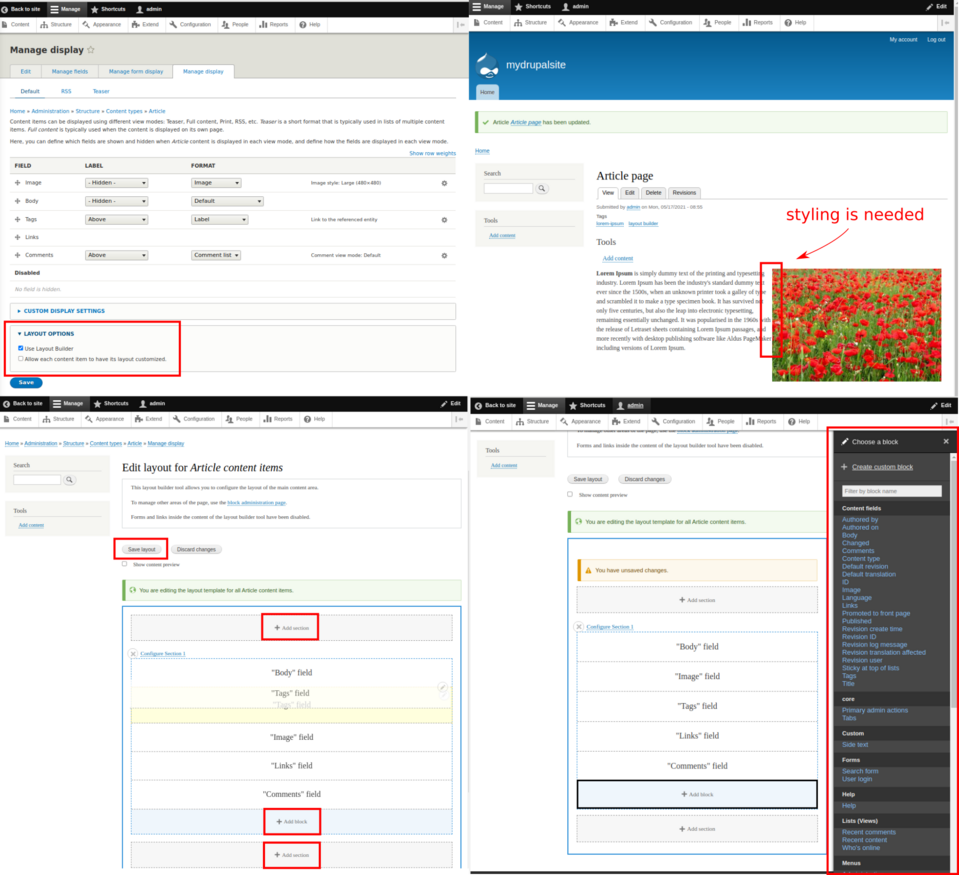
A very useful tool that has been recently added to Drupal's core is the Layout Builder module, which allows you to create templates for the structure of displaying elements on a page. The user has the ability to define their own "regions" for different types of content, using a very helpful drag and drop interface. In simple terms, it replaces the default display management function, which defines how and which fields are to be displayed, and additionally gives the opportunity to put blocks in place. When creating a template, you can feel like a graphic designer juggling the elements, while all the tools they need (in our case – the options for editing blocks and sections) are at hand in the form of an edit bar. To use this module, you need to launch it manually, as it isn’t enabled by default when installing Drupal.
When creating a new content type or wanting to use Layout Builder for an existing one, go to the display management tab. An additional "Layout options" section will appear below the list of fields, where we select the "use Layout Builder" option. Instead of a list of fields, a "manage display" button will be added, which will redirect us to the Layout Builder interface. We can freely manage the order of elements, add blocks that may contain fields from any entity, forms, plain text, links, views, and even an entire menu. Blocks are added within sections. Each section can be arranged into any number of columns between 1 and 4. The order of sections can't be changed or "dragged", so be careful when adding them.
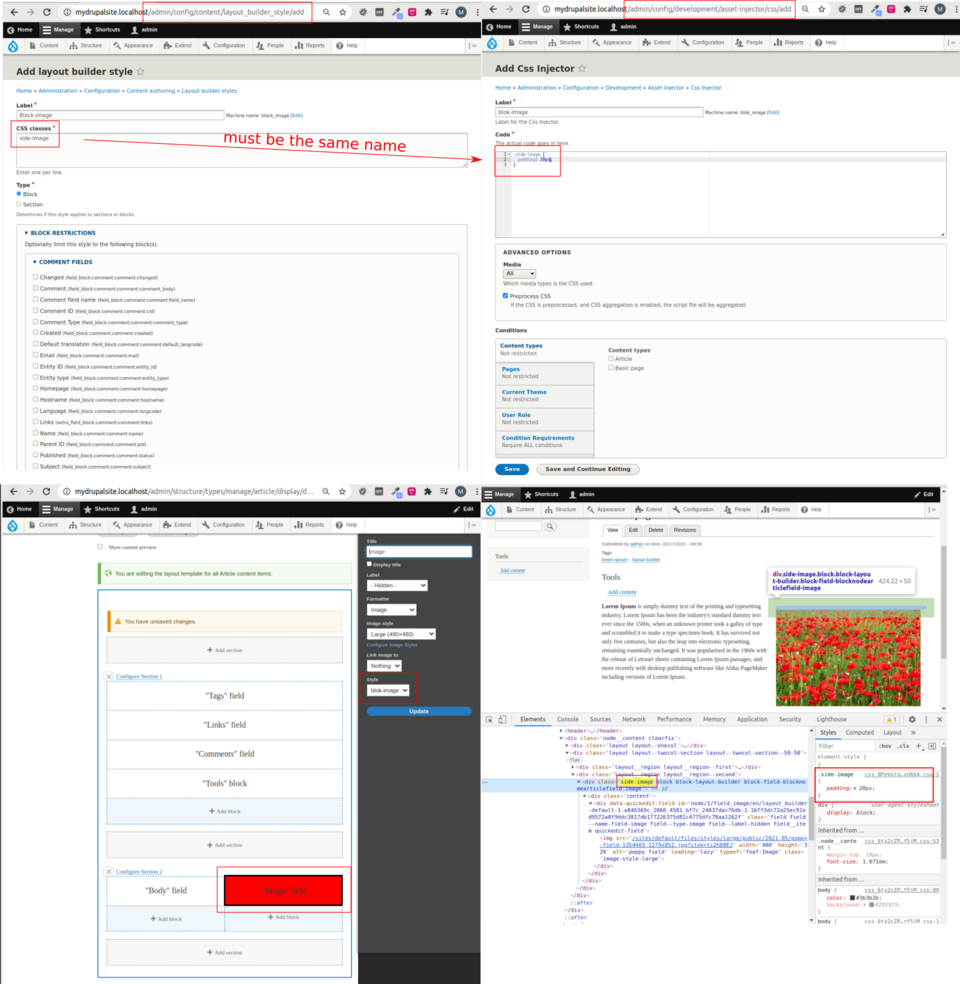
Unfortunately, Layout Builder won’t do everything for us. We need to put more effort into styling all the elements. There is, however, an additional module – Layout Builder Styles – dedicated to creating new classes for Layout Builder blocks and sections, with the ability to define restrictions concerning which blocks a given class will be assignable to. A beta version is currently available, and our Drupal installation can’t be older than version 8.7.7. However, to take full advantage of the style management capabilities, without having to interfere with the code, we need to install one more module - Asset Injector, where we'll define all the parameters of the previously created classes. Then, when editing every block or section, we'll be able to assign one class available on the list.
Paragraphs module
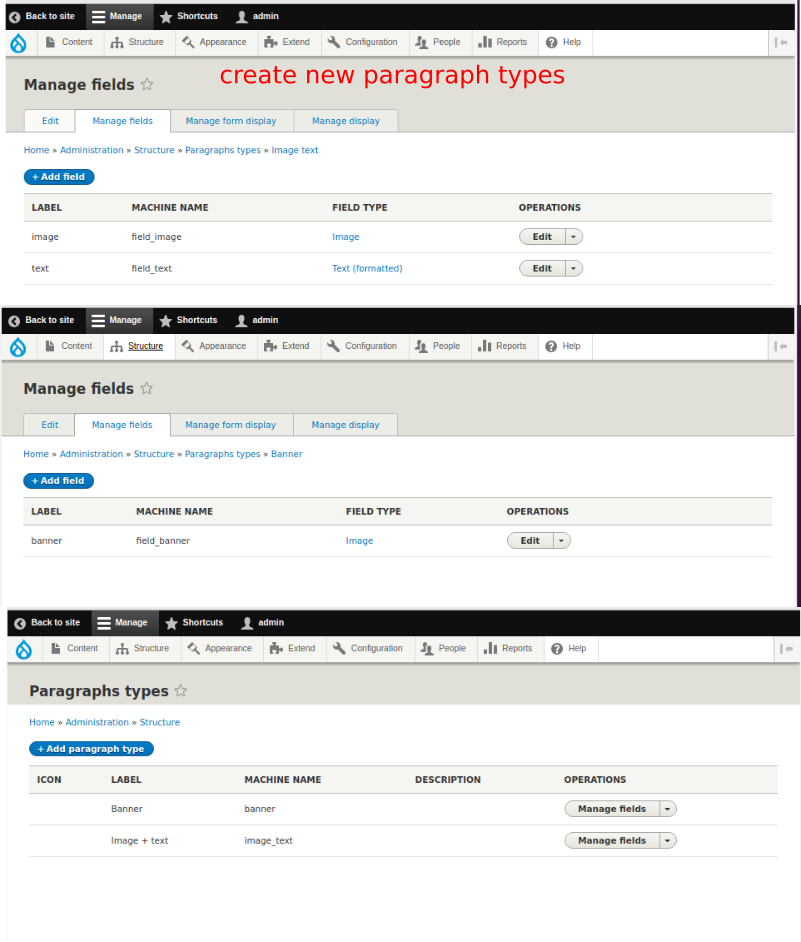
The second most frequently chosen option when creating a Drupal landing page is the use of the Paragraphs module along with Entity Reference Revisions. Paragraphs allows you to create templates that will later be sections (aka paragraphs of a page). One paragraph may consist of many fields of any type. Such a collection will constitute the type of paragraph to be used by any selected content type. For example, let's create a new content type named "Landing page". At this stage, in addition to the default "body" field, we add a few other fields that are important to us. This time, we only need one field of the paragraph type.

Now we'll create two new types of paragraphs: “banner” and “image + text”. Under Structure -> Paragraph types -> Add paragraphs type, we create new types of paragraphs and manage the fields to be included in them. For a banner, it'll mean an image field. For the “image + text” type, it'll also mean an image field and formatted text. As is the case when creating content types, with paragraph types we can manage the display of fields and their formatters. You'll surely notice in the list that you can add a field of the paragraph type, this way we can create nested paragraphs and use the already existing ones.
Having the types of paragraphs, let's check out what the landing page creation will look like. It's worth mentioning that without defining in the content type settings what specific paragraph is to be its content, we are presented with a list of all available paragraph types, which we can add multiple times thanks to setting “unlimited” when creating a paragraph field.
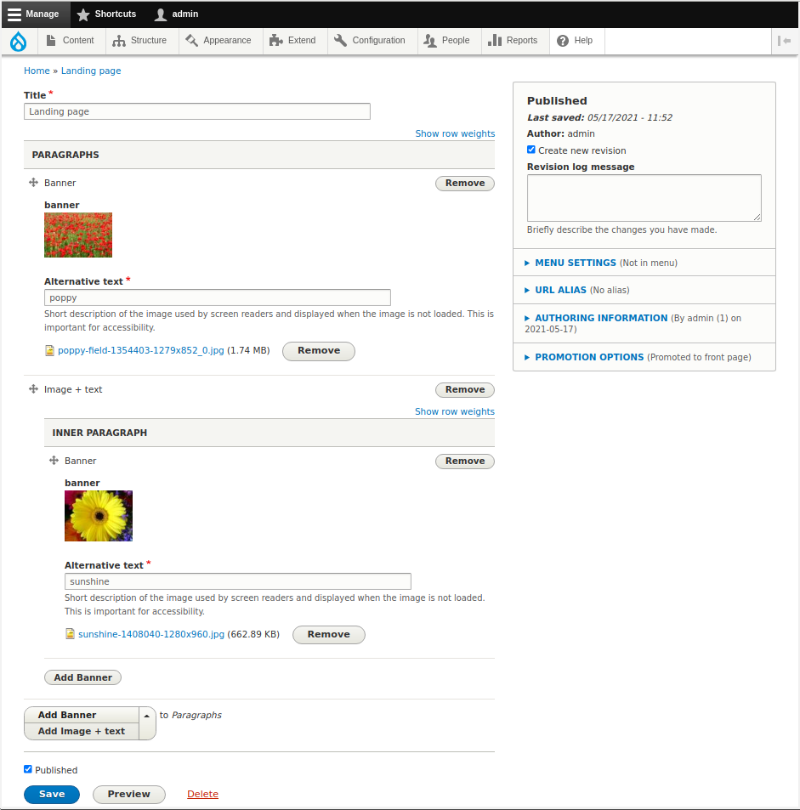
Paragraphs is a powerful tool that allows you to maintain a high degree of flexibility when creating landing pages. The pitfall when using this module is managing the content later, especially if we create a complex structure with multiple nested fields. The person editing the content on the page may then feel lost and overwhelmed by the enormity of tabs and settings.
Tuned-up paragraphs. Creating a landing page in Droopler
If you like the option of using paragraphs the most, you'll surely find what Droopler has to offer for creating one-page websites to be even better! Droopler is our free Drupal distribution for creating webpages. It contains many ready-made templates and components.
For this tool, we used the idea of creating paragraphs and nested paragraphs to "assemble" a webpage. In the default version, along with the Droopler installation we get a number of predefined types of paragraphs at our disposal. These are the most commonly used kinds of paragraphs when creating webpages.
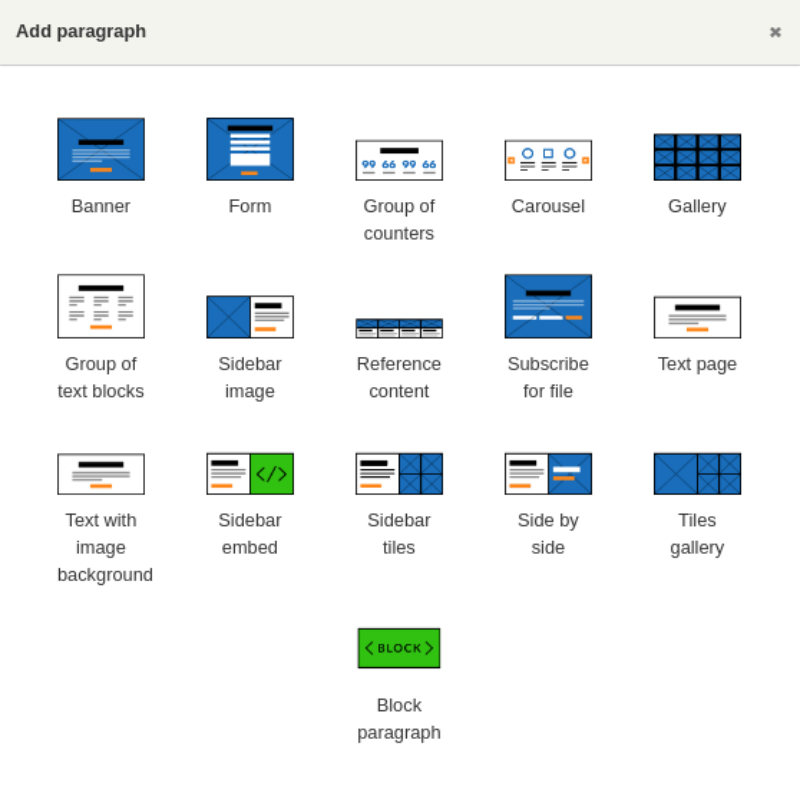
Types of paragraphs in Droopler
Then why should we use Droopler and how does it really differ from the previously presented possibilities offered by the Paragraphs module, apart from saving time when creating the most popular types of paragraphs?
Appearance
Already at first glance, we can see one fundamental difference – the added paragraphs look professional and, if we are satisfied with the used colour scheme, we don't have to do anything else with them! However, if we decide to change it, overwriting the default skin won't be a problem. You can find more information on this topic here.
Editing directly on the created page
I mentioned earlier that it can be confusing to navigate around editing a content type that consists of paragraphs. This problem has been solved in Droopler thanks to using the Geysir module and the possibility of editing paragraphs directly on the created page, in the form of modal windows. The interface also allows you to “cut” and “paste” paragraphs, that is, to reorder and remove them without having to go to a content type edit page. This way everything remains clear and we immediately see the effects of our changes.
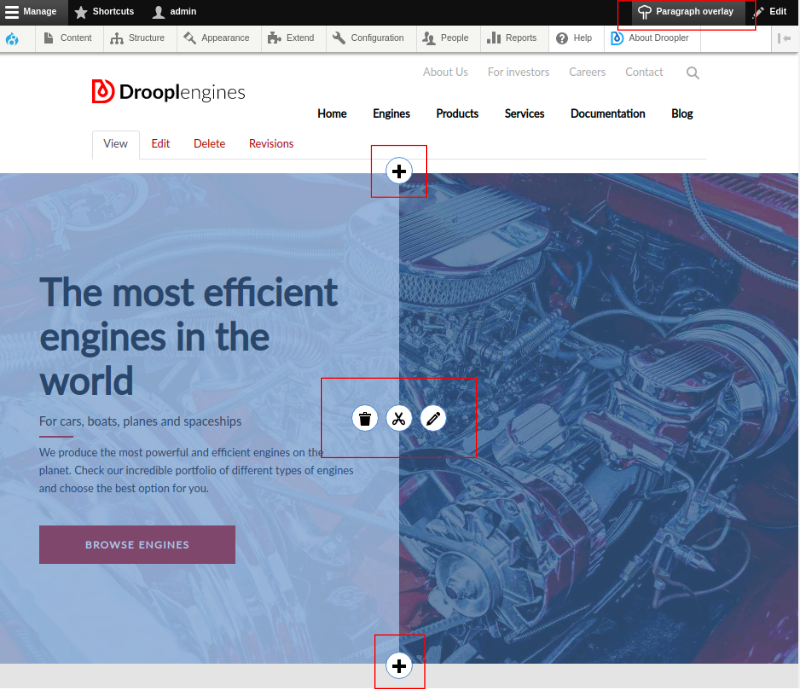
Additional options
The Paragraphs module is field-based, allows you to choose the formatter and manage the display, but there is no room anywhere for additional options related to styling or quick reorganisation of the content within a single paragraph. If we want to have a paragraph with an image gallery, we need separate types for putting 4 or 8 thumbnails. The same happens when using different types of media – a separate type is needed for images and videos.
Droopler is highly flexible in this aspect. The banner paragraph type accepts both an image and a video file. What's more, for every type of paragraph in the "settings" tab in the adding paragraph window, it's possible to configure margins and padding, as well as to define additional classes that we determine in our skin, and there's even the option of choosing a predefined colour scheme.
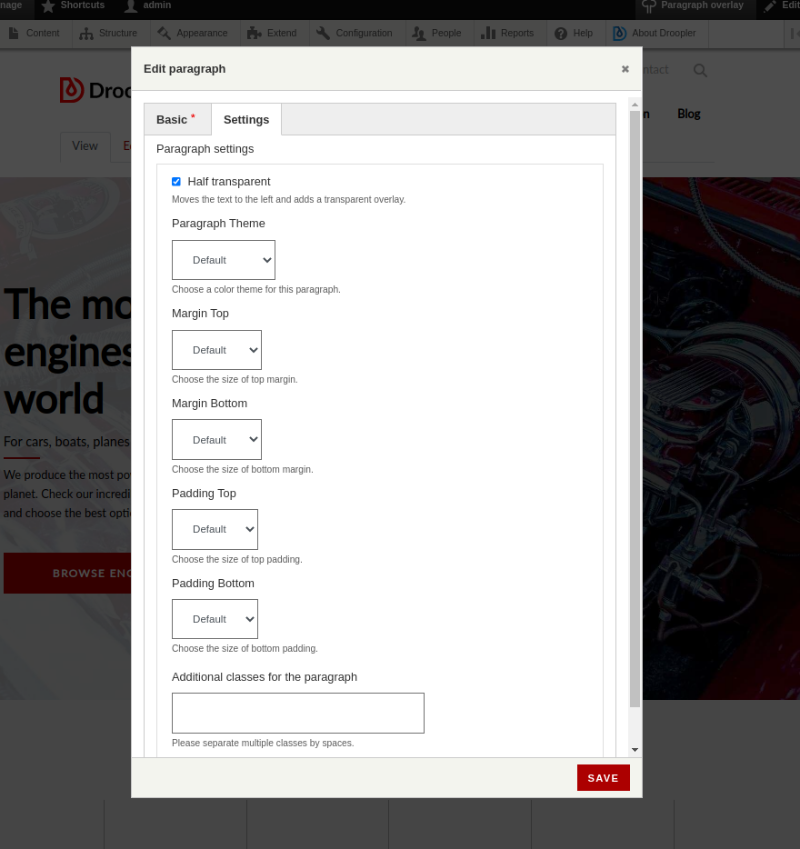
If we want to create a paragraph composed of tiles, we can choose which of them should be highlighted by increasing their size in relation to the rest, achieving the effect of a "masonry" gallery.
Do you have a prepared block that you'd like to use and place among the paragraphs? In Droopler, paragraphs can also consist of blocks, in the tab we can choose from among all those that currently exist on our page. The block with icons and links to social media - ready. A quick contact form? This has also already been done for us.
Summary
Landing pages or one-page websites are a very specific type of content that we can find around the web. It should be simple, transparent, look modern and encourage us to go to the further, target pages. It's a huge tool in the hands of marketing teams, so Drupal was also designed to give users, including non-programmers, the option to quickly create these kinds of pages. Some of the methods presented in the post show a low degree of difficulty and can be implemented by a layman (Layout Builder, Paragraphs). However, they have their limitations and at some point the "architecture" created with them becomes too complicated and difficult to maintain. Additionally, the intention to create something non-standard will require the help of a developer, especially for styling. By choosing Droopler, we can be sure that the landing page creation process will be simple and pleasant, as well as visually effective, without having to tamper with the code. Anyone, without exception, will be able to learn to manage paragraphs with ease, and in less time than expected.


