
How to Speed Up a Website on Drupal? Lazy-load Module and its Possibilities
The website loading speed is a very important aspect in the user's perception of the portal. Then how can you speed up the loading of a website that has a lot of media or iframes? One of the best solutions is to take advantage of lazy loading. The easiest way to use this method in Drupal is to use the Lazy-load module.
What is the website loading speed?
It’s the time required to display a website to a user, calculated from the moment the link is clicked. It depends on the amount of text, embedded elements (such as iframes), scripts, and media (images, videos), where the size also matters. Often the media and embedded elements take the longest to load. On big websites, many elements are invisible to the users until they scroll the website, yet they are loaded before the part that fits on the display is shown.
Google has introduced SEO guidelines in which loading speed is taken into account when positioning a website. Therefore, it’s worth taking care of the smooth display of web pages. Two significant metrics in terms of the website loading speed are TBT (Total Blocking Time) and LCP (Largest Contentful Paint). TBT indicates the time it takes for long tasks to complete, while LCP determines after how long a website's content is likely to be usable. Both metrics are largely influenced by the number and size of loaded items.
Loading the website on Drupal - Lazy-load module
Newer versions of Drupal (v9.1.0 and above), along with commonly used browsers (Chrome from v76, Firefox from v75), support lazy-loading right after installation. However, you have to reckon with the fact that many websites use older versions of Drupal. Most often, these are websites that have been developed for years, and therefore often have a lot of data (including media and embedded elements), the long loading of which worsens the perception of the portal. In such cases, it’s worth checking whether lazy loading can be used to reduce the loading time of the website and the transfer needed to load visible elements.
Released on April 10, 2018, the Drupal Lazy-load module allows you to limit the loading of the abovementioned elements to only those required at a given time. This reduces the website loading time and, above all, reduces the consumption of transmission. Due to its usefulness, the module is used by more than 10 thousand websites. It has versions for both Drupal 8+ (the latest version 8.x-3.11 as of January 31, 2022) and Drupal 7 (the latest version 7.x-1.4 as of April 22, 2019).
It’s commendable that Osman Gormus is the sole maintainer of the project, and yet the module hasn’t lost support since its creation.
To illustrate the effectiveness of the Lazy-load module, here are the test results on a website containing 36 iframes (of which 6 are visible in the loaded area) and 116 images that are out of view.

In the above example, the user is able to see the website almost fifty percent faster when using the module. Moreover, the link savings is more than 98%. Of course, the results for each website will strongly depend on the size and number of elements outside the loading area. While the example is grotesque (we are unlikely to encounter a website with such a large number of images or embedded elements), it’s meant to illustrate how important the use of a lazy loading strategy can be in the perception of a website.
Installation
The module uses additional libraries, so the installation requires taking them into account. The easiest and fastest way is to use the composer.json file for this. In a few steps, we can perform a full installation of the module, including dependencies.
- In the repositories section, we add the following:
{ "type": "composer", "url": "https://asset-packagist.org" } - Then we need to run the command (we add the -W option at the end if necessary):
composer require drupal/lazy:^3.0 bower-asset/lazysizes:^5.1 oomphinc/composer-installers-extender:^2.0 --no-update - We need to edit the extra section in composer.json to include the following:
"installer-types": ["bower-asset", "npm-asset"], "installer-paths": { … "web/libraries/{$name}": ["type:drupal-library", "type:bower-asset", "type:npm-asset"], … } - Now we can run the composer update command.
Full instructions can be found in the official documentation.
In case you need a manual installation, download the module files from its website on Drupal.org and the library available on GitHub and extract them one by one to the folders of modules/contrib/lazy and libraries/lazysizes. Full instructions can be found on the module website.
How to use the Lazy-load module?
Important: The module has its own configuration located under the path of admin/config/content/lazy. It’s divided into 3 tabs.
1. General settings
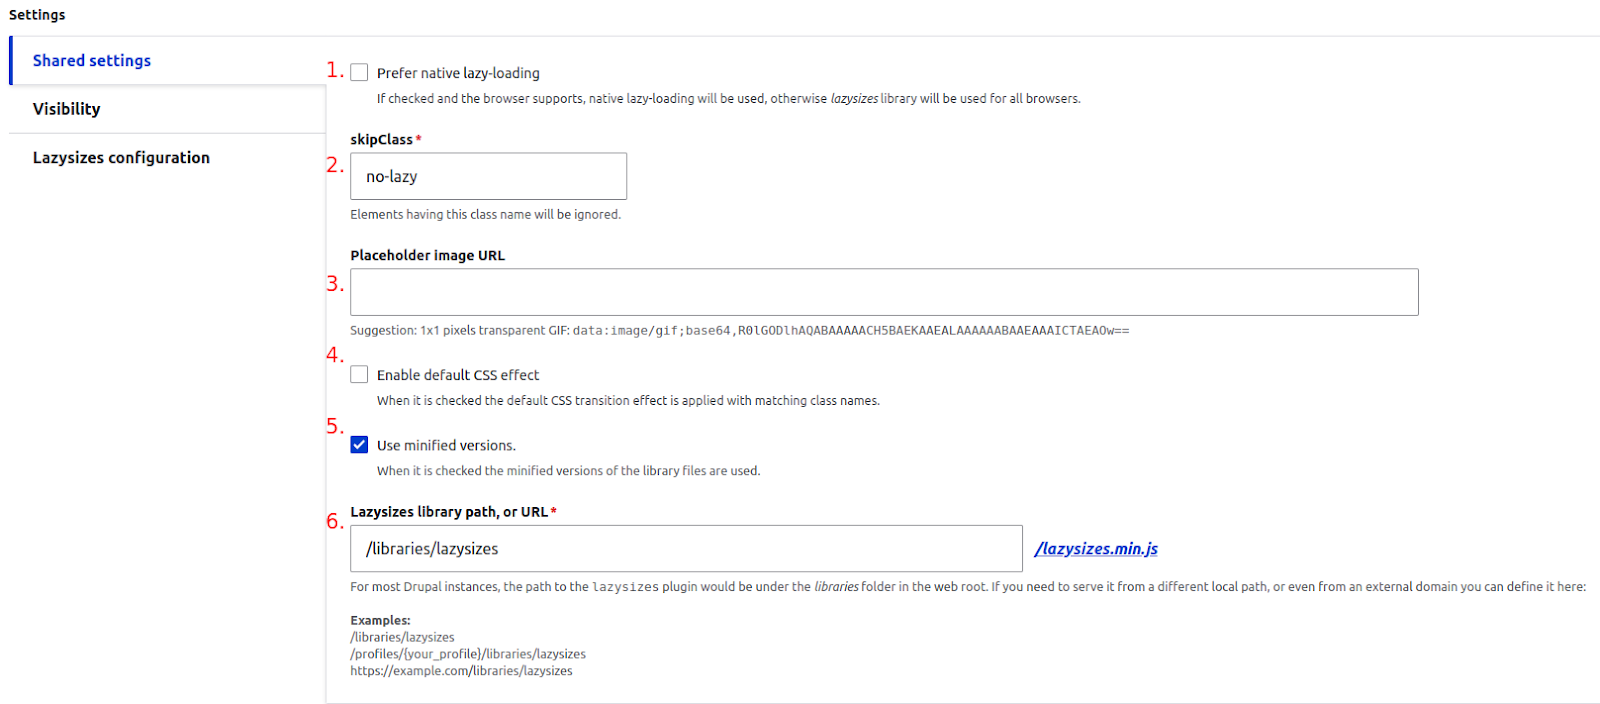
- Prefer native lazy-loading - checking the option will force the use of lazy loading embedded in the browser.
- skipClass - elements that have the class entered won’t use lazy loading.
- Placeholder image URL - image inserted in the place of loaded objects.
- Enable default CSS effect - enabling default transitions when loading objects, using CSS with appropriate classes.
- Use minified versions - checking this option will cause the use of minified versions of scripts.
- Lazysizes library path, or URL - path or address pointing to the Lazysizes library (required by the module).
2. Visibility
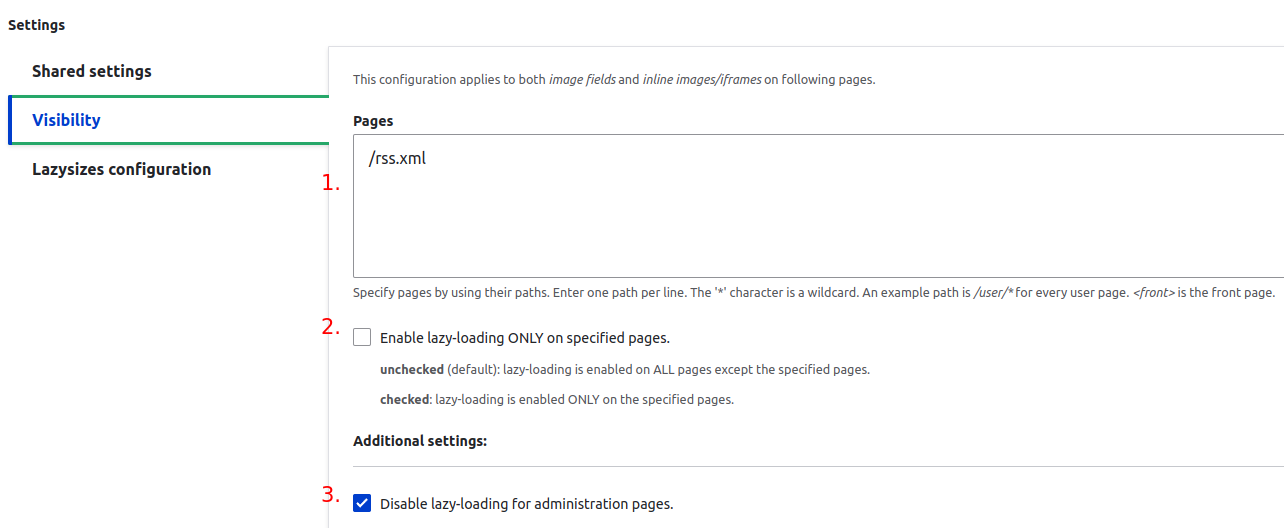
- Pages - the paths of websites to use or have disabled lazy loading, dependent on the checkbox from point 2.
- Enable lazy-loading ONLY on specified pages - the option determining whether the paths entered in point 1 should have lazy-loading disabled (unchecked option), or whether it should be active only on the indicated websites (checked option).
- Disable lazy-loading for administration pages - blocks the execution of the module script on administrative websites.
3. Lazysizes Configuration
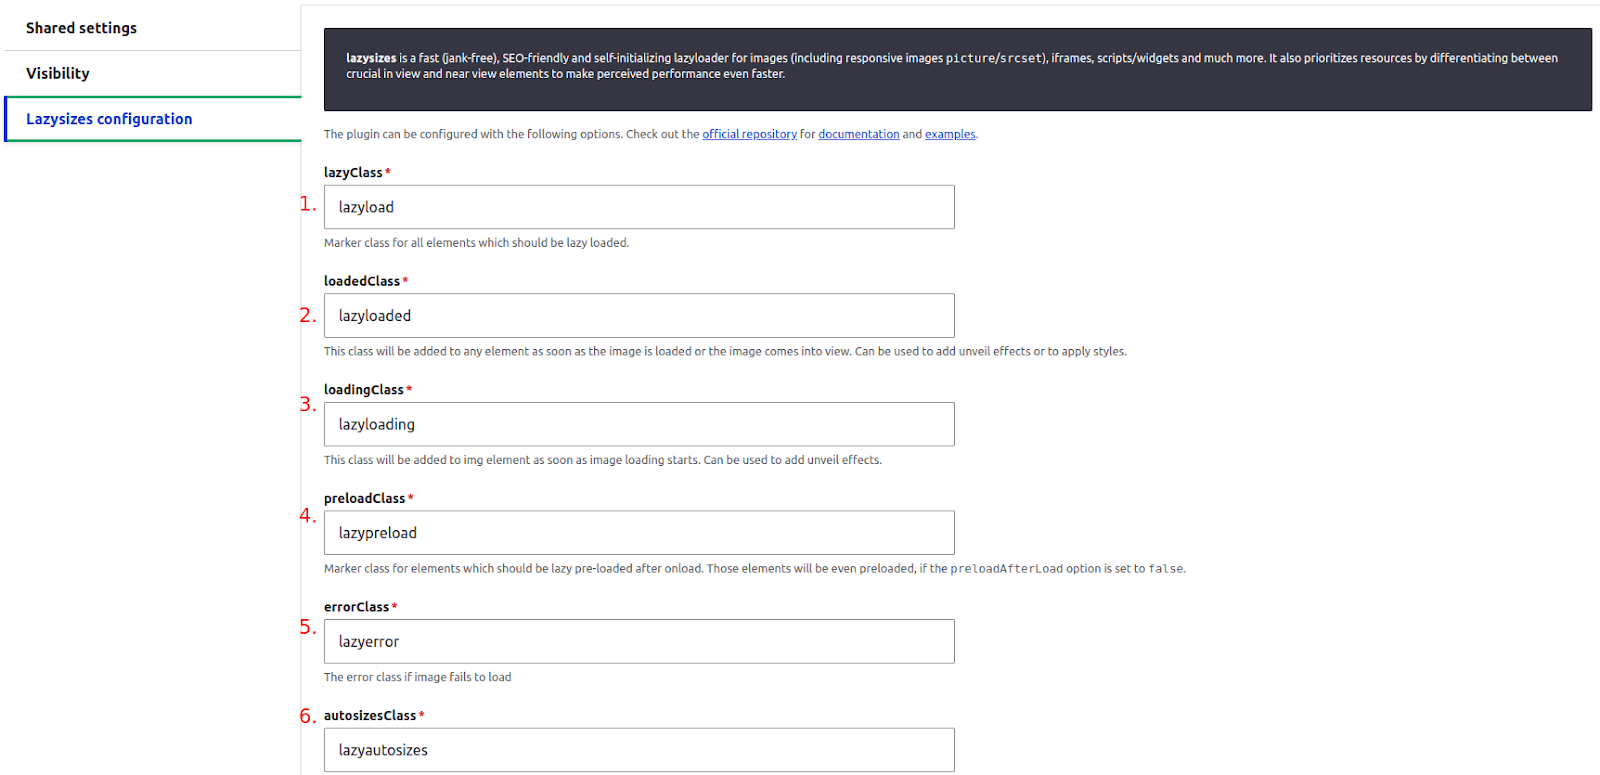
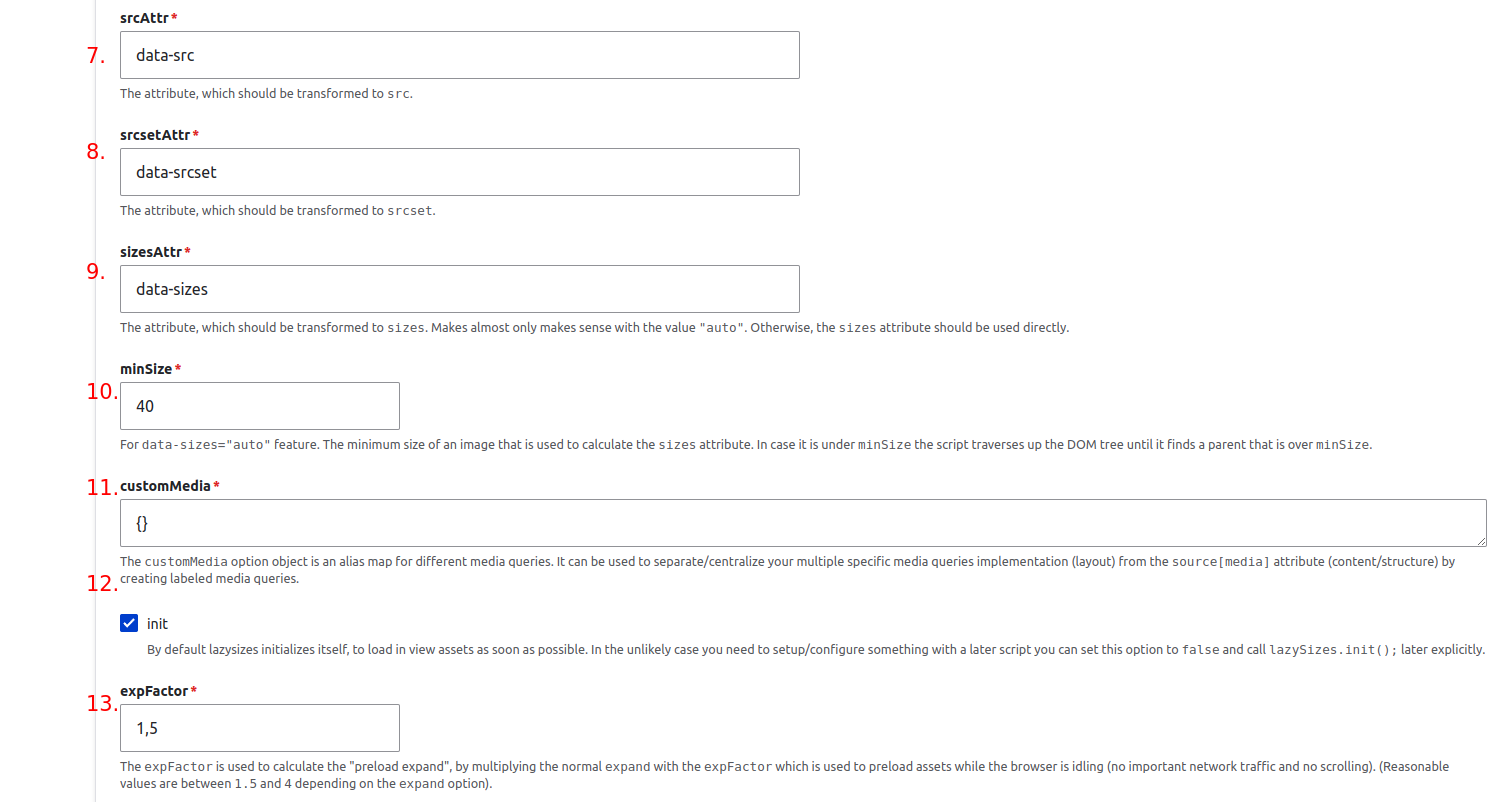

- lazyClass - a class designating the elements that should be considered for lazy loading.
- loadedClass - a class assigned when the element is loaded.
- loadingClass – a class assigned when the element is being loaded.
- preloadClass - a class designating the elements that should be loaded after "onload”.
- errorClass - a class assigned to the elements whose loading failed to complete correctly.
- autosizesClass - a class designating the elements that will be automatically scaled.
- srcAttr - the attribute of src
- srcsetAttr - the attribute of srcset
- sizesAttr - the attribute of sizes
- minSize - for use with data-sizes=”auto”. The minimum image size to calculate the attribute of sizes.
- customMedia - an object that is an alias for mapping various media queries. It can be used to separate/centralize the implementation (layout) of multiple specific media queries from the attribute of source[media] (content/structure) through the creation of tagged media queries.
- init - determines the initialization of the Lazysizes library. In some cases, it may be required to disable automatic initialization. Manual initialization is then required by using lazySizes.init();.
- expFactor - a factor indicating how many assets should be loaded when no valid action is performed.
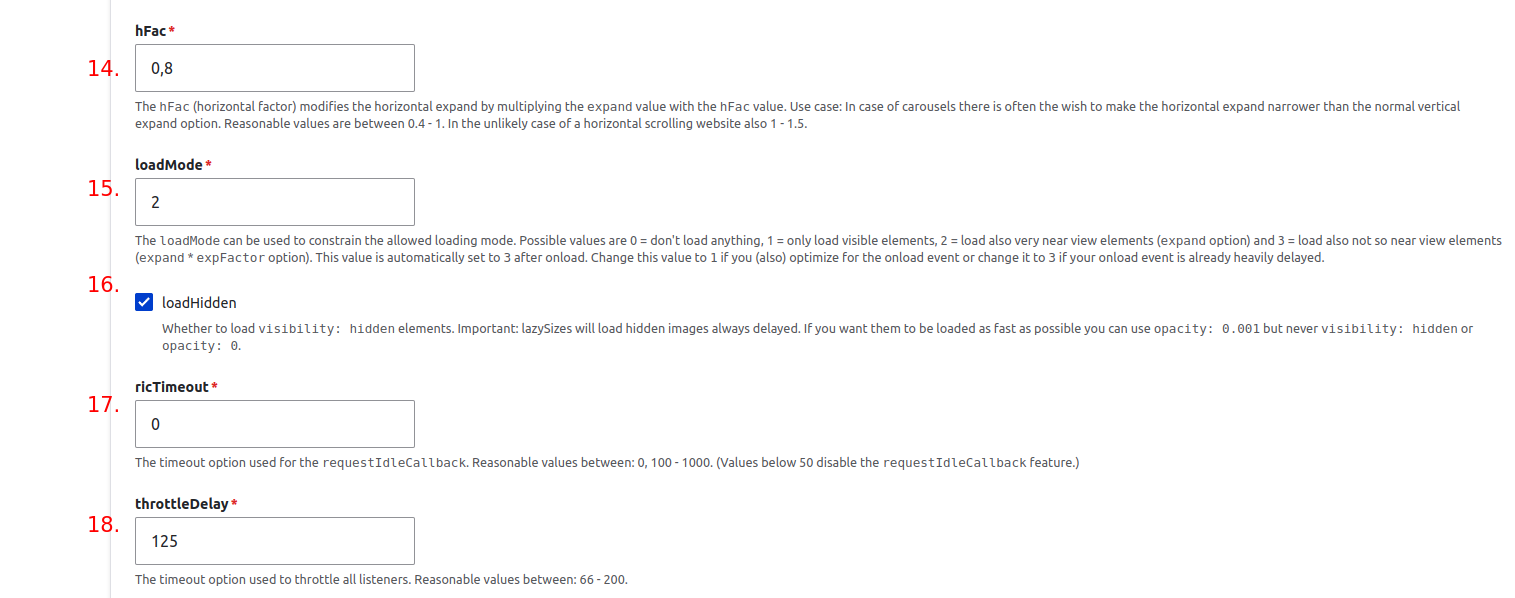
- hFac – a factor analogous to expFactor, but in horizontal orientation.
- loadMode - loading mode. 0 - no loading, 1 - loading of visible elements only, 2 - loading of visible and close elements, 3 - loading of visible, close and catching elements within the range of expansion by expFactor. During onload, the option is automatically set to 3.
- loadHidden - determines whether hidden elements should also be loaded. LazySizes loads such elements with a delay.
- rlcTimeout - delay option for requestIdleCallback.
- throttleDelay - delay used for listeners.
- Plugins - selection of plugins that should be attached. The full specification and description of plugins can be found on Github.
In order to attach lazy loading, editing the display of the fields for which its use is needed is required. For example, you want to enable the addition of images that support lazy loading on the page type websites. To do this, you need to perform the following steps:
1. Select Structure -> Content Types -> Content Page -> Manage Fields in the admin panel (admin/structure/types/manage/page/fields).
2. Add a new field (e.g. of the Image type).
3. Go to display management.

4. Expand the field options (click the cog symbol on the right-hand side).

5. In the expanded settings, check the box of Enable lazy-loading.
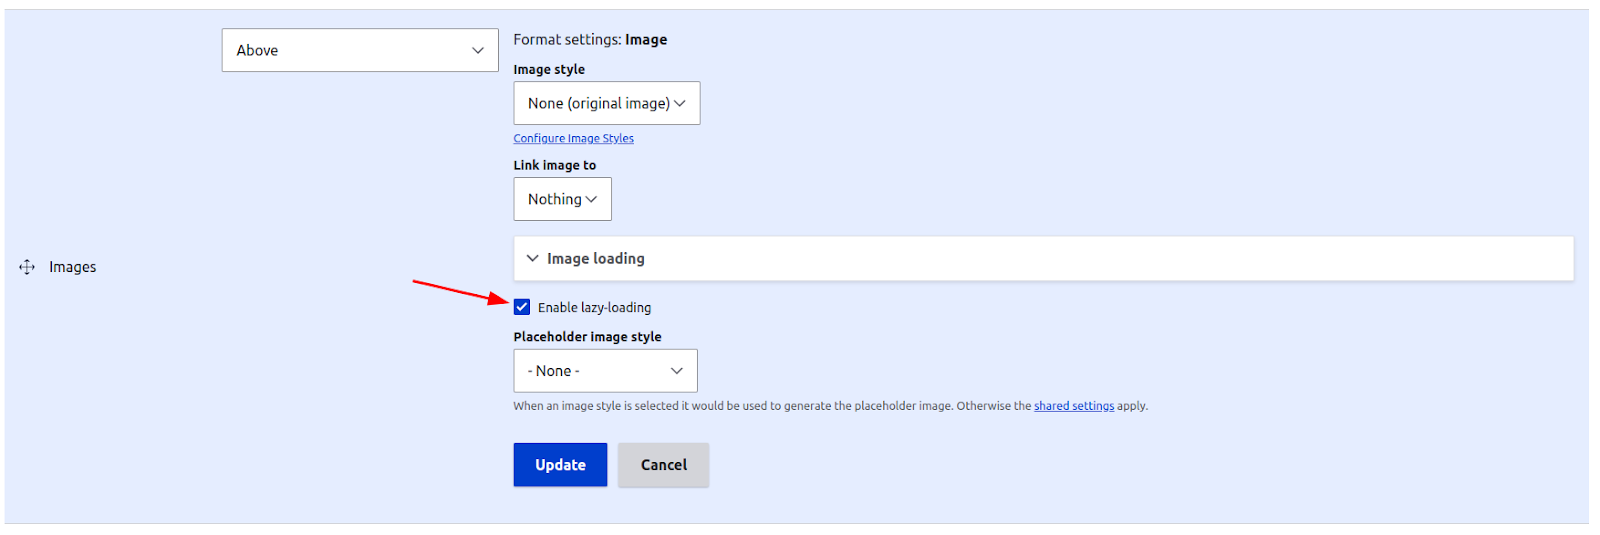
From this moment on, all images added in this field will use lazy loading. What's more, classes will be added, set in the module's configuration (admin/config/content/lazy) in the Lazysizes configuration tab, discussed earlier in the Lazysizes configuration section.
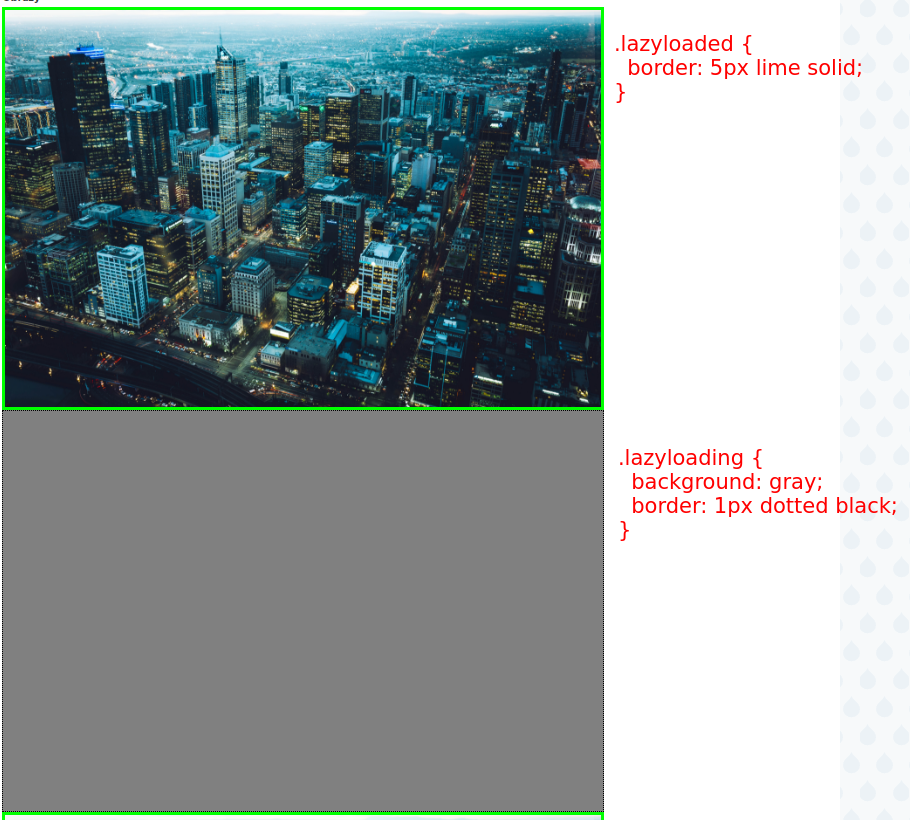
With the above settings, we can add effects to elements with lazy loading, depending on their status, using styling in CSS files (such as blurring images that are still being loaded or adding a red border to elements that failed to load). Below is an example with two images – one fully loaded (top) and one in the process of loading (bottom):
For embedded content, added within the content, be sure to add the attribute of loading=”lazy”, as in case of iframe:
<iframe loading="lazy" src="example-page">Hook
The module adds the hook of hook_lazy_field_formatters_alter, which allows adding formatters, not yet supported, to image-based fields.
Example:
function hook_lazy_field_formatters_alter(array &$formatters) {
  $formatters[] = 'xyz_module_field_formatter';

  return $formatters;
}
Drupal Lazy-load module - summary
Using the Drupal Lazy-load module significantly reduces the loading time of websites that have multiple media, which are outside the visible area, immediately after they are loaded, and reduces user data transmission. Lazy-load is useful for older versions of Drupal, as newer versions have native lazy-load support embedded. However, even for them, this module is noteworthy for its configurable styling of elements, depending on their current loading status.
Are you wondering if the Lazy-load module is right for your website? We maintain and develop a lot of websites on Drupal, so applying our experience, we’ll be happy to recommend which solution will be best for your website.


